
How to Fix Leak in Kitchen Sink Drain: Step-by-Step Guide
Fixing a leak in your kitchen sink drain is simple. You can do it yourself with basic tools.
A leaky kitchen sink drain can cause frustration and mess. Water dripping under the sink can damage cabinets and floors. Learning how to fix this problem can save you money and time. In this blog post, you’ll find easy steps to identify and repair the leak.
No need to call a plumber! Whether it’s a loose pipe joint or a worn-out seal, you’ll learn how to tackle it. Let’s get started and fix that leak today!

Identifying The Leak
Identifying the leak in your kitchen sink drain is the first step. This will help you figure out where the problem lies. A quick inspection can save time and prevent further damage. Let's dive into how to pinpoint the leak with ease.
Common Leak Locations
Leaks often occur in a few common areas. Check around the P-trap, which is the U-shaped pipe under your sink. Also, inspect the faucet connections and the drain strainer. These spots are prone to leaks and should be your first points of inspection.
Tools Needed For Detection
You don’t need many tools to detect a leak. A flashlight is essential to see into dark areas. Paper towels help identify leaks by showing wet spots. A small mirror can help you see hard-to-reach places. Keep these tools handy as you inspect your sink.
Credit: www.youtube.com
Gathering Necessary Tools
Before fixing a leak in your kitchen sink drain, gather the necessary tools. Having everything ready will save time and prevent frustration. Let's look at the basic plumbing tools and safety equipment you need.
Basic Plumbing Tools
First, get a wrench. A pipe wrench or adjustable wrench works best. Next, grab a pair of pliers. Pliers help tighten or loosen nuts and bolts. A plumber's tape is also essential. It helps seal pipe threads. Have a bucket ready to catch any water. Keep a screwdriver handy. It can be useful for removing screws. Lastly, a utility knife can help cut sealant or tape.
Safety Equipment
Safety is important. Wear gloves to protect your hands. Gloves also provide a better grip. Use safety goggles to protect your eyes from debris. A face mask can help if you are sensitive to dust or mold. Keep a towel nearby to clean spills. Finally, ensure you have a flashlight. It helps see under the sink clearly.
Preparing The Sink Area
Fixing a leak in your kitchen sink drain begins with proper preparation. Before you start, it's essential to make sure the sink area is ready. This step ensures the repair process goes smoothly and efficiently. Here’s how to prepare the sink area effectively.
Clearing The Cabinet
First, clear out the cabinet beneath the sink. Remove all items stored there. This allows you to have better access to the pipes and drain. It also prevents any damage to your belongings. Make sure the area is completely empty before proceeding.
Placing A Bucket
Next, place a bucket under the sink drain. This will catch any water that drips while you work. A bucket helps keep the area clean and dry. It also prevents water from spilling on the cabinet floor. Make sure the bucket is large enough to hold any excess water.

Credit: alfaplumbingservices.com
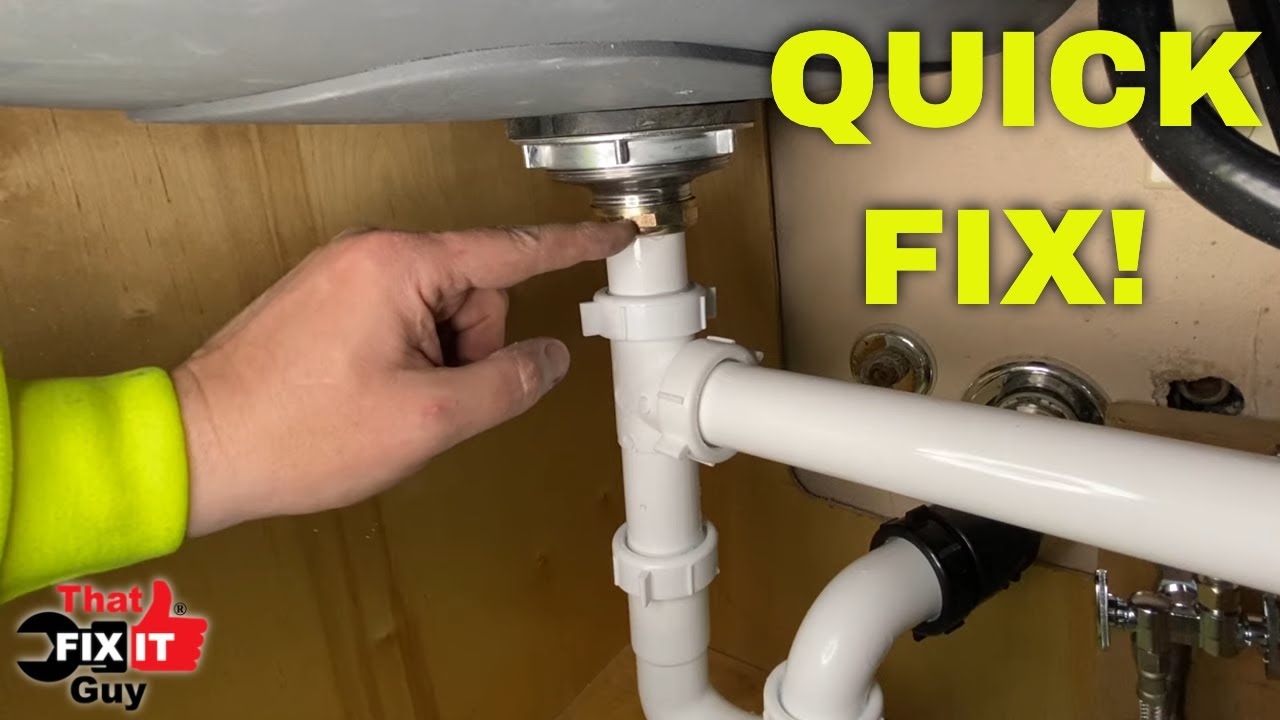
Removing The P-trap
Removing the P-trap is essential to fix a leak in your kitchen sink drain. The P-trap is the curved pipe under the sink. It holds water and blocks sewer gases. Leaks often happen here due to old or damaged parts. Follow these steps to remove it safely.
Loosening The Nuts
First, place a bucket under the P-trap. This catches any water that spills out. Use adjustable pliers to loosen the slip nuts on both ends of the P-trap. Turn the nuts counterclockwise until they are loose enough to remove by hand. Be careful, as water may spill out when the trap is removed.
Inspecting The P-trap
Once the P-trap is removed, inspect it closely. Look for cracks, wear, or build-up inside. These issues often cause leaks. If you see any damage, consider replacing the P-trap with a new one. Clean the trap with warm, soapy water to remove any debris. This ensures a good seal when reinstalled.
Cleaning The Pipes
A leak in your kitchen sink drain can be frustrating. Cleaning the pipes may help fix the problem. This step is essential to ensure water flows smoothly. Over time, debris builds up inside the pipes. This can cause blockages and lead to leaks.
Removing Debris
First, remove any debris from the pipes. Use a pipe cleaner or a long brush. Insert it into the pipe and twist gently. This helps loosen any stuck debris. Pull out the cleaner and dispose of the debris properly.
Next, flush the pipes with hot water. Boil a pot of water and pour it down the drain. This helps wash away any remaining particles. Repeat this process a few times for best results.
Checking For Damage
After removing debris, check the pipes for any visible damage. Look for cracks, holes, or rust spots. These can cause leaks and need attention. If you find any damage, consider replacing the damaged section.
To check for hidden damage, run water through the pipes. Observe if there are any drips or leaks. If you notice any, mark the spot. This helps you know where the problem is.
Fixing a leak in your kitchen sink drain involves cleaning and checking the pipes. By removing debris and checking for damage, you can solve the problem effectively.
Replacing Worn-out Parts
Replacing worn-out parts is a crucial step in fixing a leaky kitchen sink drain. Over time, components in the sink drain can wear out. This leads to leaks and water damage. Tackling this issue involves choosing the right replacement parts. Then, installing new components correctly.
Choosing Replacement Parts
Start by identifying the parts causing the leak. These could be gaskets, washers, or the P-trap. Take the worn-out parts with you to the hardware store. This ensures you get the exact replacements. Matching the parts is key to preventing future leaks.
Installing New Components
After getting the replacement parts, it’s time to install them. Begin by removing the old, worn-out components. Clean the areas thoroughly to ensure a proper fit. Place the new gaskets or washers in their respective spots. Tighten connections securely, but avoid over-tightening. This can cause damage. Finally, run water to check for leaks.
Reassembling The Drain
Reassembling the drain is the final step in fixing a kitchen sink leak. This process ensures that the newly fixed components are securely in place. Proper reassembly is crucial to prevent future leaks. Follow the steps below to reassemble the drain properly.
Securing The P-trap
First, grab the P-trap. Align it with the sink drain pipe. Make sure it fits snugly. Next, connect the other end to the wall drain pipe. Check the alignment. It should be straight without any gaps. Use your hands to secure the slip nuts. Tighten them until they feel secure. Do not over-tighten them.
Tightening Connections
Now, focus on the connections. Use pliers to make them tight. Check all the joints. Make sure there are no loose parts. Turn the slip nuts clockwise. Do this until they are snug. Avoid using too much force. This can damage the parts. Once tightened, run water to test for leaks. If there are no leaks, the job is done.
Testing For Leaks
So, you've tightened everything and made sure all connections are secure. But how do you know if the leak is really fixed? It's time to test for leaks. This step is crucial to ensure your repair work holds up under real-world conditions. Here's how to do it effectively.
Running Water
First, turn on the faucet and let the water run for a few minutes. This isn't just a quick splash. You want the water to flow steadily, simulating normal use. Think of it like taking your car for a spin after a tune-up. You need to see if everything is working properly under pressure.
While the water is running, observe the drain area closely. Any signs of water trickling or forming puddles? If yes, you might have missed a spot. If not, you're on the right track.
Checking For Drips
Now, grab a flashlight and get under the sink. This part might feel like a bit of a treasure hunt, but instead of gold, you're looking for drips. Shine the light around the pipes and connections.
- Check the joint connections.
- Inspect the P-trap.
- Look at the garbage disposal (if you have one).
Sometimes, the leaks are sneaky and only show up after a while. Give it a few minutes and be patient. If you spot any drips, tighten the connections a bit more or reapply some plumber's tape.
Testing for leaks is like making sure your cake is baked all the way through before you frost it. You don't want any surprises later. So take your time and be thorough. Once you're confident there are no leaks, you can put everything back under the sink and get on with your day.
Maintaining Your Sink Drain
Maintaining your sink drain is crucial to prevent leaks and clogs. Proper maintenance ensures that your kitchen sink functions smoothly. This section will guide you through regular inspections and preventive measures to keep your sink drain in top condition.
Regular Inspections
Regular inspections help identify potential issues before they become major problems. Check your sink drain for any signs of wear or damage. Look for leaks around the joints and connections. Inspect the pipes under the sink for rust or corrosion. Early detection can save you time and money.
Preventive Measures
Preventive measures can reduce the risk of leaks in your kitchen sink drain. Avoid pouring grease or oil down the drain. They can solidify and cause clogs. Use a drain strainer to catch food particles and debris. Regularly clean the strainer to prevent buildup. Pour hot water down the drain once a week to clear minor clogs.
Use baking soda and vinegar to clean your drain monthly. Pour a cup of baking soda followed by a cup of vinegar. Let it sit for 15 minutes, then flush with hot water. This natural method helps keep your pipes clear and odor-free.
Frequently Asked Questions
How To Stop A Kitchen Drain From Leaking?
To stop a kitchen drain from leaking, tighten the connections under the sink. Replace worn-out washers or gaskets. Apply plumber's tape to threaded connections. Check and seal any cracks or gaps with plumber's putty. Regularly inspect and maintain drain components to prevent future leaks.
What Is The Most Common Leak Under The Kitchen Sink?
The most common leak under the kitchen sink is from a faulty or worn-out pipe connection or P-trap.
Is It Better To Use Silicone Or Plumbers Putty For Sink Drain?
Silicone is better for sink drains. It provides a watertight seal and lasts longer than plumber's putty.
What Is The Best Way To Seal A Kitchen Sink Drain?
Use plumber's putty or silicone sealant to seal a kitchen sink drain. Apply around the drain flange, then tighten.
Conclusion
Fixing a leak in your kitchen sink drain is simple and doable. Follow the steps, and you can save money and stress. Remember to gather all necessary tools before starting. Check the connections and seals carefully. Tighten everything properly to avoid future leaks.
If the problem persists, consider consulting a professional. Regular maintenance helps keep your sink in top shape. A well-maintained sink ensures smooth kitchen operations. So, take the time to fix it right. Your kitchen will thank you.
No comments