
How to Install a Kitchen Sink Faucet: Step-by-Step Guide
Installing a kitchen sink faucet is easier than you might think. You don't need to be a professional to get it done.
So, you've decided to upgrade your kitchen sink faucet. Maybe the old one leaks, or you just want a new look. Installing a new faucet can seem like a big task, but with the right tools and some patience, you can do it yourself.
In this guide, we'll walk you through each step, making it simple and manageable. By the end, you'll have a shiny new faucet and the satisfaction of knowing you did it yourself. Let's get started and make your kitchen look great!
Tools And Materials Needed
Installing a kitchen sink faucet can seem like a daunting task, but with the right tools and materials, you can complete the job smoothly. Whether you're a DIY enthusiast or a novice, having everything ready before you start is essential. Let's break down the items you'll need for this project.
Essential Tools
First things first, gather your tools. These are the basic items you'll need:
- Adjustable Wrench: Useful for tightening and loosening nuts.
- Basin Wrench: Perfect for reaching tight spaces under the sink.
- Plumber's Tape: Ensures a tight seal on threaded connections.
- Bucket: Handy for catching any water drips during the process.
- Flashlight: Illuminates dark areas under the sink, making it easier to see what you're doing.
Required Materials
In addition to tools, you'll need some materials to complete the installation:
- New Faucet: Choose one that fits your sink's configuration and matches your kitchen decor.
- Supply Lines: These connect the faucet to your home's water supply.
- Plumber's Putty: Used to create a watertight seal around the faucet base.
- Silicone Sealant: Provides an extra layer of protection against leaks.
Here's a quick overview in a table for easy reference:
| Tools | Materials |
|---|---|
| Adjustable Wrench | New Faucet |
| Basin Wrench | Supply Lines |
| Plumber's Tape | Plumber's Putty |
| Bucket | Silicone Sealant |
| Flashlight |
Remember, preparation is key! Having these tools and materials at hand will save you time and reduce frustration. Now, you're one step closer to installing your new kitchen sink faucet like a pro!
Preparing Your Workspace
Before installing a kitchen sink faucet, it's crucial to prepare your workspace. Proper preparation ensures a smooth and efficient installation process. Let's break down the steps to get your area ready.
Clearing The Area
Start by removing all items around the sink. This includes soap, towels, and any other objects. Clear out the space under the sink as well. This will give you enough room to work.
Check for any water damage or mold. If you find any, address it before proceeding. A clean and clear area is essential for a hassle-free installation.
Gathering Supplies
Next, gather all the necessary supplies. You will need a new faucet, a basin wrench, and plumber's tape. Keep a bucket and towels handy to catch any water spills.
Ensure you have a flashlight or work light. Good lighting helps you see clearly while working under the sink. Having all supplies ready saves time and reduces frustration.
Turning Off The Water Supply
Before installing a new kitchen sink faucet, turning off the water supply is crucial. This step prevents leaks and water damage. Follow these instructions to ensure a smooth installation process.
Locating The Shutoff Valves
First, find the shutoff valves under the sink. These valves control the water flow to the faucet. Typically, they are located at the back of the cabinet. Look for two small valves connected to the water pipes. One is for hot water, the other for cold. Turn both valves clockwise to shut off the water supply.
Draining The Pipes
After turning off the shutoff valves, open the faucet to drain any remaining water. This step releases water pressure and prevents spills. Turn on both the hot and cold handles. Let the water run until it stops completely. Ensure all water is drained from the pipes.

Removing The Old Faucet
So, you're ready to upgrade your kitchen with a new faucet? That's fantastic! But before we can install that shiny new fixture, we have to tackle the not-so-glamorous task of removing the old faucet. Don't worry, though. We'll walk you through it step-by-step. Let's start by disconnecting the water lines and detaching the old faucet.
Disconnecting Water Lines
First things first: we need to disconnect the water lines. This step is crucial to avoid any unexpected sprays or leaks. Here’s how you can do it:
- Turn off the water supply: Look under your sink for the shutoff valves. Turn them clockwise to stop the water flow.
- Open the faucet: Turn on the faucet to release any remaining water in the lines. This will make things less messy.
- Disconnect the supply lines: Using a wrench, unscrew the nuts connecting the water supply lines to the faucet. Keep a bucket handy to catch any drips.
And just like that, the water lines are disconnected! Not too bad, right?
Detaching The Old Faucet
Now that the water is off, it’s time to remove the old faucet. This part can be a bit tricky, but with some patience, you’ll get it done. Here’s what to do:
- Locate the mounting nuts: These are usually found underneath the sink, holding the faucet in place. You might need a flashlight to see them clearly.
- Loosen the nuts: Use a basin wrench to loosen and remove the nuts. If they’re stuck, applying a bit of penetrating oil can help.
- Remove the faucet: Once the nuts are off, gently lift the old faucet out from above the sink. If it’s stubborn, a little wiggling should do the trick.
And there you have it! The old faucet is now out of the way, making room for your new, stylish fixture. You’re one step closer to enjoying your revamped kitchen. Ready for the next step? Let's keep going!
Installing The New Faucet
So, you've decided to replace your kitchen sink faucet. Great choice! Whether you're upgrading to a modern design or simply fixing a leaky old fixture, installing a new faucet doesn't have to be complicated. In this section, we will walk you through the process step-by-step. By the end, you'll have a shiny new faucet ready to use. Let's dive in!
Positioning The Faucet
First things first, you need to position your new faucet. This step is crucial because a misplaced faucet can lead to leaks and a lot of frustration. Here’s how to do it:
- Place the gasket: Most faucets come with a rubber or plastic gasket. Place it over the holes in your sink. This helps seal the faucet to prevent water from leaking underneath.
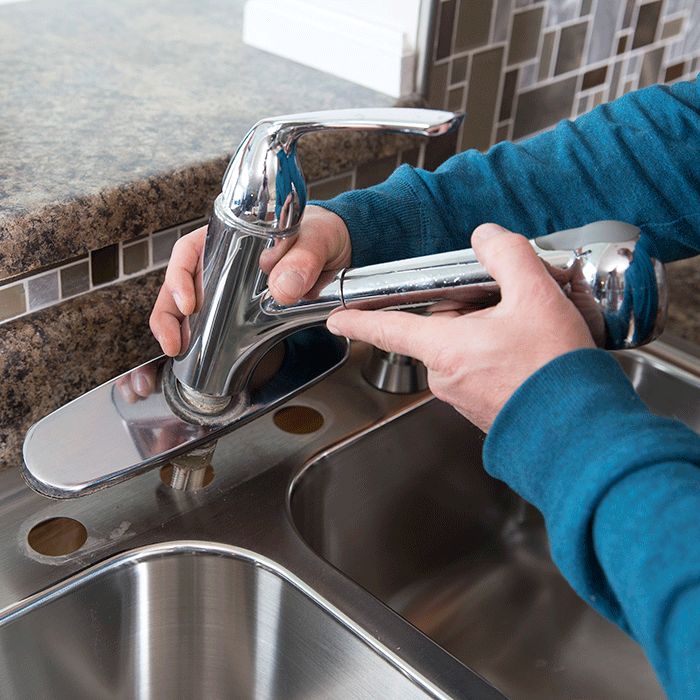
- Insert the faucet: Carefully insert the faucet through the hole in your sink. Ensure it’s centered and sitting flat against the sink.
- Check the alignment: Before tightening anything, make sure your faucet is aligned correctly. It should face forward and be straight. A quick double-check now can save a lot of hassle later.
Securing The Faucet
Now that your faucet is in place, it’s time to secure it. This step will ensure your faucet stays put and operates smoothly.
- Tighten the mounting nuts: Underneath the sink, you’ll find mounting nuts that hold the faucet in place. Use a wrench to tighten these nuts. Be careful not to overtighten, which can damage the sink or the faucet.
- Attach the water supply lines: Connect the hot and cold water supply lines to the corresponding inlet ports on the faucet. Use a wrench to secure them, but again, don't overtighten.
- Check for leaks: Turn on the water supply and check for any leaks. If you see any, tighten the connections a bit more.
And there you have it! With your faucet secured and no leaks in sight, you’re ready to enjoy your new kitchen upgrade. Not so bad, right?
Credit: www.lowes.com
Connecting Water Supply Lines
Connecting the water supply lines to your new kitchen sink faucet is a critical step. This ensures you get the hot and cold water flow correctly. Let's break down the process into simple steps. Follow these to avoid leaks and ensure a secure connection.
Attaching Hot And Cold Lines
First, identify the hot and cold water lines. Typically, the hot water line is on the left. The cold water line is on the right. Attach the hot water line to the left inlet on the faucet. Then, connect the cold water line to the right inlet. Make sure each line is properly aligned before tightening.
Tightening Connections
Use a wrench to tighten the connections. Do not overtighten, as this can damage the fittings. Hand-tighten first, then use the wrench for a snug fit. Check for any leaks by turning on the water. If there are leaks, tighten the connections a bit more. Ensure all connections are secure and leak-free.
Testing For Leaks
So, you’ve installed your new kitchen sink faucet and it looks fabulous. But, hold on a second! Before you start showing off your handyman skills, there's one crucial step left – testing for leaks. This step ensures that your new faucet doesn’t turn your kitchen into a swimming pool. Let's dive into it!
Turning On The Water
First things first. You need to turn on the water supply to your faucet. If you’ve turned off the main water supply during the installation, it's time to turn it back on. Here’s how:
- Locate the water valves under your sink. You should see two valves, one for hot water and one for cold water.
- Turn both valves counterclockwise to open them. If you're unsure, just remember: lefty-loosey, righty-tighty!
- After opening the valves, go ahead and turn on your faucet. Let the water run for a couple of minutes. This helps flush out any debris or air pockets in the lines.
Checking For Drips
Now that the water is flowing, it’s time to play detective and check for any leaks. Here are some simple steps to follow:
- Inspect the connections: Look closely at all the connections under the sink. This includes the water supply lines and the faucet connections. Use a flashlight if needed.
- Feel for moisture: Run your hand along the connections and pipes. If you feel any moisture, there might be a leak.
- Check the faucet base: Look around the base of the faucet where it meets the sink. Sometimes, leaks can occur at this junction.
If you spot a leak, don’t panic! Here’s what you can do:
- Turn off the water supply again.
- Tighten the connections using a wrench. Be careful not to overtighten, as this can cause damage.
- Turn the water back on and check again for leaks.
Remember, it’s normal to have a few drips initially, but if the leaks persist, you might need to recheck the installation steps or consult a professional. After all, you wouldn’t want a leaky faucet to rain on your parade, would you?
Testing for leaks might seem like a small step, but it's a crucial one. It ensures that your new kitchen faucet works perfectly and saves you from potential water damage. Happy plumbing!
Final Touches
Final touches are crucial to ensure your kitchen sink faucet works perfectly. These steps will complete your installation and make sure everything functions smoothly.
Adjusting Water Flow
First, turn on the water supply valves under the sink. Slowly open the hot and cold valves. This prevents sudden pressure surges. Next, turn on the faucet to check the water flow. Look for any leaks around the base and connections. Tighten connections if necessary. Ensure both hot and cold water flow correctly. Adjust the handles for a balanced flow. This step ensures your faucet operates smoothly.
Cleaning Up
Clean the area around your new faucet. Remove any tools, old parts, and debris. Wipe down the sink and countertop with a damp cloth. Use a mild cleaner to remove any fingerprints or smudges. Check for any stray sealant or plumber's putty. Remove these with a soft cloth. Make sure the faucet shines and looks brand new. This final step ensures your kitchen looks neat and tidy.
Frequently Asked Questions
Can I Install A Kitchen Faucet By Myself?
Yes, you can install a kitchen faucet by yourself. Follow the manufacturer's instructions and use basic tools. Make sure to turn off the water supply before starting.
Why Spray Wd-40 Up Faucets?
Spray WD-40 up faucets to prevent rust, loosen mineral deposits, and ensure smooth operation of handles and valves.
Do You Need Plumbers Putty To Install A Kitchen Faucet?
You don't always need plumber's putty to install a kitchen faucet. Many faucets come with rubber or plastic gaskets.
How Do You Install A Faucet Step By Step?
Turn off the water supply. Remove the old faucet. Install the gasket and new faucet. Tighten the mounting nuts. Connect the water supply lines. Turn on the water and check for leaks.
Conclusion
Installing a kitchen sink faucet is easier than it seems. Follow the steps carefully. Gather all needed tools first. Turn off the water supply. Remove the old faucet. Clean the sink area well. Fit the new faucet in place. Tighten the connections securely.
Turn on the water supply. Check for any leaks. A new faucet can enhance your kitchen's look. Enjoy your new, functional faucet. Happy plumbing!
No comments