How to Start a Pellet Stove Step by Step
Learn how to start a pellet stove step by step with our easy guide. Discover proper techniques, safety tips, and troubleshooting advice.

The temperature's dropping, there's a chill in the air, and you're eyeing that pellet stove in your living room wondering how exactly this thing works. Maybe you've just moved into a home with one already installed, or perhaps you've made the smart decision to add one for supplemental heating. Either way, you're standing there realizing that pressing a button and hoping for the best probably isn't the ideal approach.
Pellet stoves might look intimidating at first glance, with their electronic controls, auger systems, and specialized fuel requirements. But here's the reassuring truth. Once you understand the basics, operating a pellet stove becomes second nature. These efficient heaters are actually designed to be user-friendly, far more so than traditional wood stoves that require constant attention and manual fire management.
The beauty of pellet stoves lies in their automation. Once you get things going properly, the stove essentially takes care of itself, feeding pellets as needed and maintaining consistent heat output. It's like having a fireplace that does most of the work for you while delivering impressive efficiency and relatively clean burning.
Understanding how to start a pellet stove step by step ensures you operate your heater safely while getting maximum performance from the very first burn. Whether you're firing up a brand-new unit or restarting one that's been dormant since last winter, this comprehensive guide walks you through everything from initial setup to that first satisfying flicker of flame.
Ready to get warm? Let's dive in.
Understanding Your Pellet Stove Components
Before starting anything, knowing what you're working with helps everything make sense.
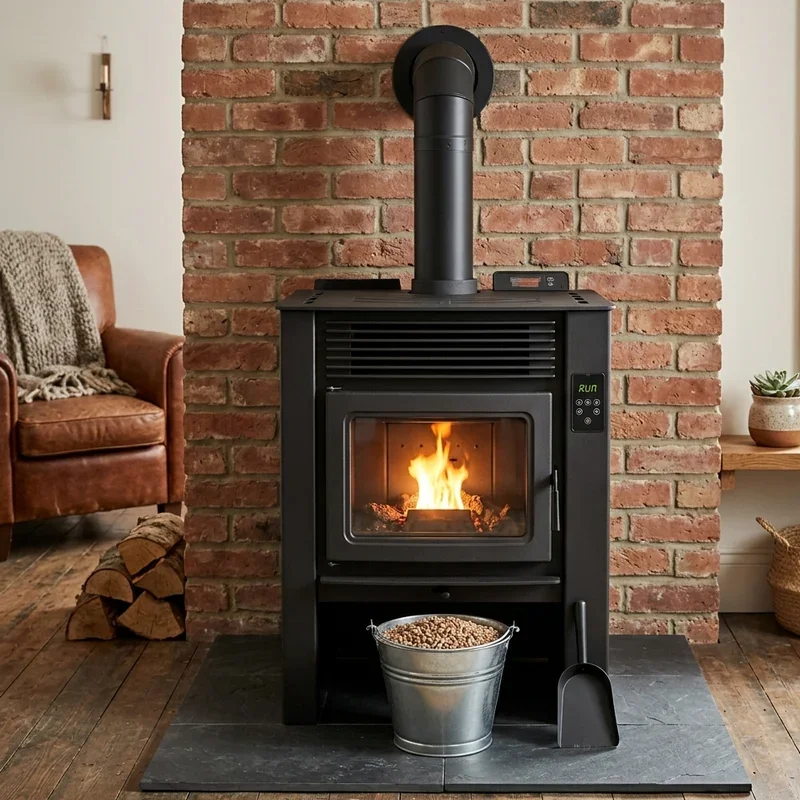
The Hopper System
The hopper is that large bin on top of or beside your stove where you'll pour the pellets. Think of it as your fuel tank, holding anywhere from forty to eighty pounds of pellets depending on your stove's size. A full hopper can keep your stove running for twelve to twenty-four hours or even longer at lower heat settings. The hopper feeds pellets downward into the auger system through gravity, so keeping it adequately filled ensures uninterrupted operation.
The Auger Mechanism
The auger is essentially a motorized screw that transports pellets from the hopper to the burn pot. When you set your desired heat level, the control board adjusts how quickly the auger rotates, controlling pellet feed rate. Faster rotation means more fuel and more heat. This automated feeding system is what sets pellet stoves apart from traditional wood burners.
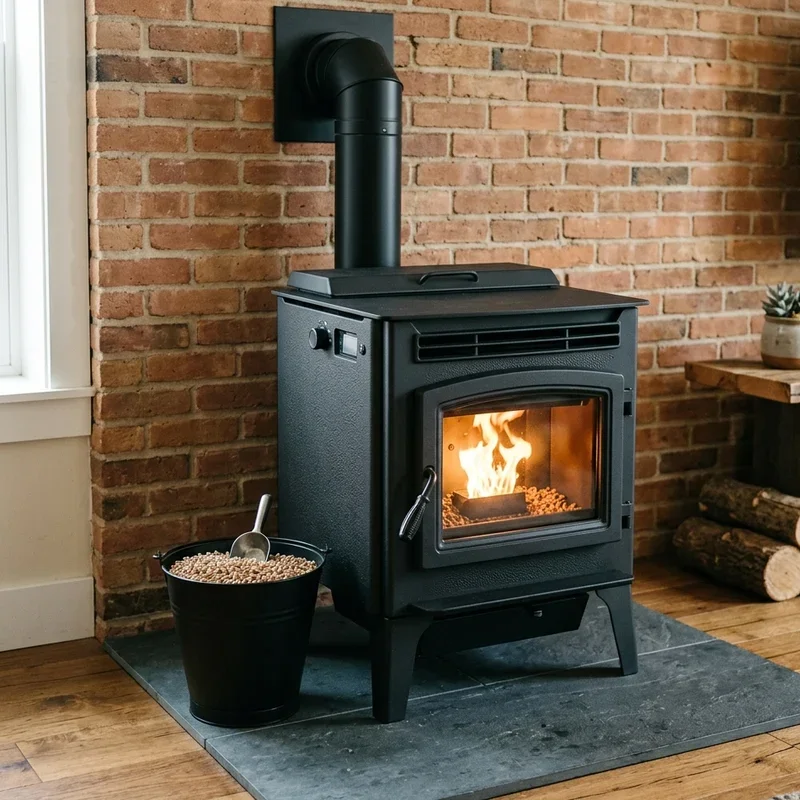
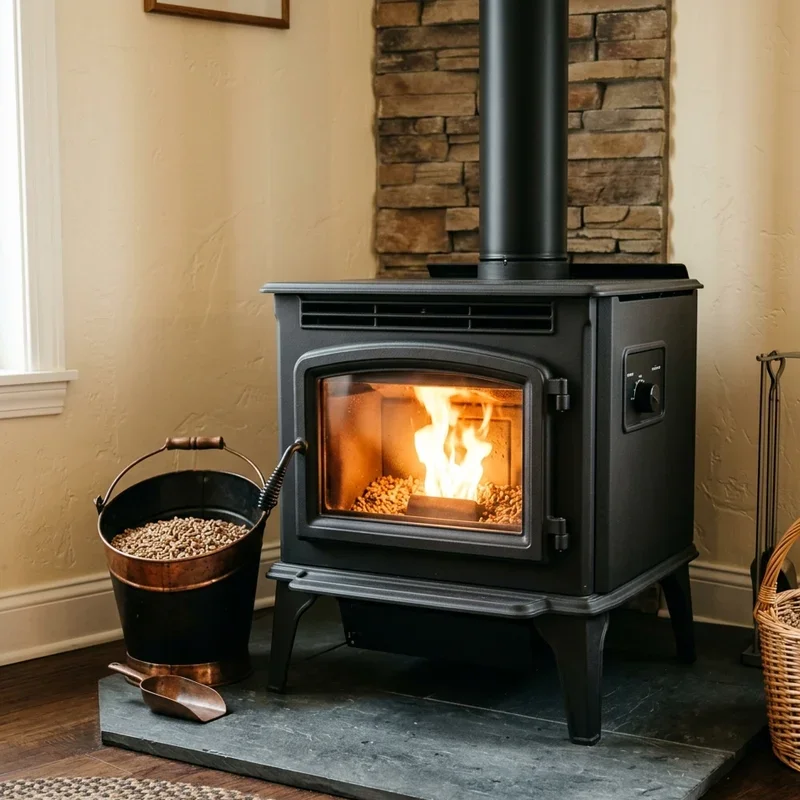
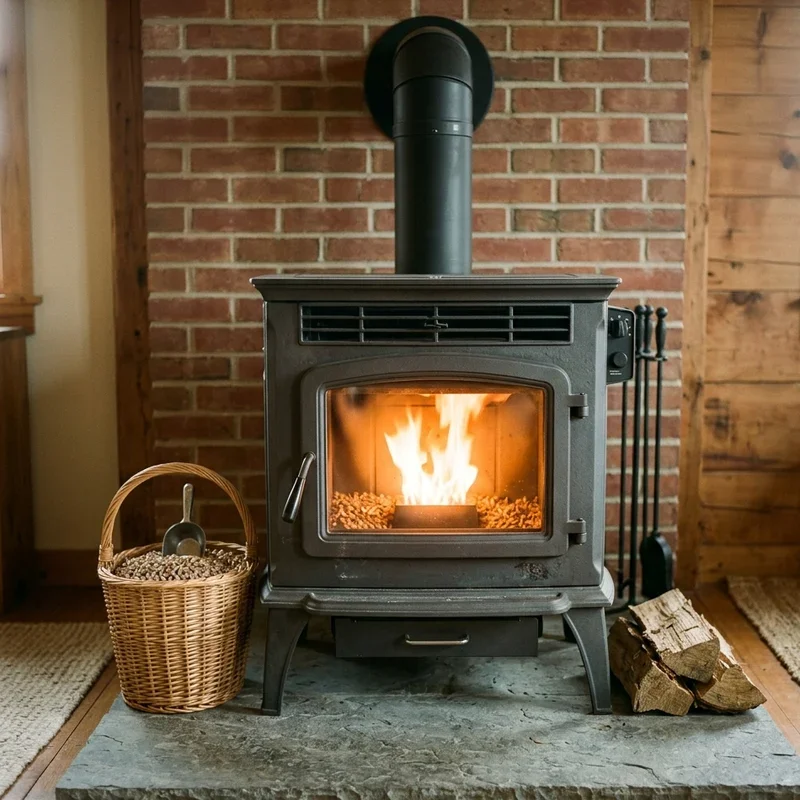
The Burn Pot
Also called the fire pot or combustion chamber, this is where the magic happens. Pellets drop from the auger into this metal container where ignition occurs. Air flows through holes in the burn pot, feeding oxygen to the combustion process. Keeping this component clean is essential for proper operation since ash buildup restricts airflow.
The Igniter System
Most modern pellet stoves use electric igniters that automatically light pellets when you start the stove. These work like glow plugs, heating to high temperatures that ignite the initial pellet charge. Some older or manual models require gel fire starters or manual ignition methods instead.
The Blower System
Pellet stoves typically use multiple blowers. The combustion blower draws air into the burn pot and expels exhaust gases. The convection or room blower pushes heated air into your living space. These fans are essential for operation and make some noise, which surprises first-time pellet stove owners expecting silent heat.
How to Start a Pellet Stove Step by Step: Pre-Start Preparation
Getting ready before ignition prevents problems and ensures smooth startup.
Inspecting the Stove
Before your first use of the season or after any extended downtime, give your stove a thorough visual inspection. Check that the exhaust vent pipe connections are secure and haven't come loose. Look for any obvious damage, debris, or blockages in visible components. Verify that the hopper lid seals properly and the door gasket appears intact. This quick inspection catches issues before they become problems.
Cleaning the Burn Pot
A dirty burn pot is the number one cause of startup problems and poor performance. Remove any ash, clinkers, or debris from the burn pot before starting. Ensure all air holes in the pot are clear and unobstructed. Even a thin ash layer can prevent proper ignition on some stoves. Start every burning session with a clean burn pot for best results.
Checking the Ash Pan
The ash pan beneath the burn pot collects combustion residue and needs regular emptying. A full ash pan can restrict airflow and cause operational problems. Before starting, pull out the pan and dispose of any accumulated ash. Some stoves have sensors that prevent operation when ash levels are too high.
Verifying Electrical Connection
Pellet stoves require electricity to operate their various motors, blowers, and control systems. Ensure your stove is properly plugged into a working outlet. Consider using a surge protector to guard against power fluctuations that can damage control boards. Battery backup systems are available for those concerned about heating during power outages.
Loading Pellets Properly
Quality fuel loaded correctly ensures optimal stove performance.
Choosing Quality Pellets
Not all pellets are created equal, and your stove's performance depends heavily on fuel quality. Look for pellets with less than one percent ash content for cleanest burning. Premium hardwood or softwood pellets meeting PFI standards provide consistent heat output. Store pellets in dry conditions since moisture absorption ruins their burning characteristics.
Filling the Hopper
Open the hopper lid and pour pellets in, filling to the level indicated by your manufacturer or to within an inch of the top. Avoid overfilling since pellets need room to flow properly. Check for any foreign objects that might have gotten into your pellet bag, as hardware or plastic can damage the auger system.
First-Time Priming
On a brand-new stove or after a complete hopper emptying, the auger channel needs priming with pellets. This typically happens automatically during startup, but the initial ignition cycle takes longer as pellets travel from hopper to burn pot. Allow extra time for this first cycle to complete.
How to Start a Pellet Stove Step by Step: The Ignition Process
Now comes the exciting part where your stove comes to life.
Step One: Power On
Turn on your pellet stove using the main power switch. Some stoves have separate circuit breaker switches while others simply plug in and respond to control panel commands. Wait for the control panel to initialize, displaying startup information or default settings.
Step Two: Set Your Desired Heat Level
Most pellet stoves offer heat settings from low to high, typically numbered one through five or displayed as a temperature range. Start at a medium setting for initial burns. You can adjust once the stove is running and you see how it performs in your space.
Step Three: Initiate the Start Cycle
Press the start button or turn the control to the ignition position. The stove now begins its automated startup sequence. You'll hear the combustion blower begin running, drawing air through the system and creating draft.
Step Four: Pellet Feed Begins
After a brief delay, the auger motor engages and begins moving pellets toward the burn pot. You might hear a grinding or turning sound as the auger operates. Pellets will start dropping into the burn pot within a minute or two depending on your stove model.
Step Five: Ignition Occurs
The electric igniter heats up, glowing red-hot to ignite pellets as they accumulate in the burn pot. This process takes several minutes. You'll see smoke first, then small flames appearing as pellets catch fire. The ignition cycle typically takes five to fifteen minutes to establish a stable flame.
Step Six: Normal Operation Begins
Once flames are established and detected by the stove's sensors, it transitions into normal running mode. The room blower typically kicks on at this point, pushing warm air into your space. The stove now regulates itself based on your heat setting.
Monitoring Initial Operation
The first few minutes of operation deserve attention to ensure everything's working correctly.
Watching for Proper Flame
A healthy pellet stove flame should appear bright yellow to orange with minimal smoke once fully established. Flames should be steady without excessive flickering or dying down. Blue flames or lazy, weak flames may indicate air supply problems or fuel quality issues.
Listening for Normal Sounds
Pellet stoves aren't silent machines. You'll hear the auger turning periodically, blowers running continuously, and the occasional sound of pellets dropping into the burn pot. These sounds are normal. Unusual grinding, scraping, or squealing noises warrant investigation.
Checking Exhaust Output
If visible from outside, observe your exhaust vent briefly. You should see minimal visible emissions once the stove reaches operating temperature. Heavy smoke or unusual colors might indicate incomplete combustion or fuel problems.
Feeling for Heat Output
Within fifteen to thirty minutes, you should notice warm air coming from the stove's room blower. The stove body itself will become hot. Keep children and pets away from the heated surfaces.
Adjusting for Optimal Performance
Fine-tuning maximizes efficiency and comfort.
Heat Level Adjustments
After the stove runs for an hour or so, assess whether your heat setting matches your comfort needs. Adjust up or down as necessary. Higher settings consume more pellets and generate more heat. Finding the sweet spot for your space takes some experimentation.
Airflow Adjustments
Some pellet stoves have manual air intake adjustments that affect combustion. Consult your owner's manual for guidance on optimal settings for your climate and altitude. Improper air adjustment causes incomplete combustion and excessive ash production.
Thermostat Integration
Many pellet stoves can connect to thermostats for automated temperature regulation. The stove modulates its output or cycles on and off to maintain your desired room temperature. This set-it-and-forget-it convenience is one of pellet heating's biggest advantages.
Safety Considerations
Pellet stoves are generally safe but deserve respect as heating appliances.
Clearance Requirements
Maintain proper clearance between your stove and combustible materials like furniture, curtains, and walls. Manufacturer specifications vary, but most require several inches of space around the unit. Floor protection beneath the stove prevents heat damage to flooring.
Carbon Monoxide Awareness
While pellet stoves vent combustion gases outside, having carbon monoxide detectors in your home provides important backup protection. Test these devices regularly, especially during heating season.
Hot Surface Precautions
Pellet stove surfaces become extremely hot during operation. Use heat-resistant gloves when adding pellets to a running stove. Teach children about the dangers of touching hot surfaces. Consider protective barriers if small children or curious pets are household members.
Electrical Safety
Don't use extension cords with pellet stoves since they can overheat and create fire hazards. Ensure your outlet can handle the electrical load. Consider dedicated circuits for larger stoves.
Troubleshooting Common Startup Problems
Sometimes things don't go as planned, but solutions usually exist.
Stove Won't Ignite
If your stove fails to light, check whether pellets are actually reaching the burn pot. Clean the burn pot and verify the igniter is functional. Some igniters wear out over time and require replacement. Manual ignition using gel starters provides backup for igniter failures.
Excessive Smoke at Startup
Some smoke during initial startup is normal, but excessive smoke continuing after several minutes indicates problems. Check for blockages in the exhaust system. Verify the combustion blower is operating. Poor quality or wet pellets can also cause smoking issues.
Stove Shuts Down Shortly After Starting
Premature shutdown often results from inadequate airflow or sensor issues. Clean the exhaust passages and verify venting is unobstructed. Some stoves have safety sensors that shut down operation if conditions aren't ideal. Error codes on the display help diagnose specific problems.
Weak Flame or Poor Heat Output
Insufficient heat usually traces back to dirty components, poor pellet quality, or air supply problems. Clean the burn pot, heat exchanger, and exhaust passages. Try different pellet brands if quality is suspect. Check air intake for blockages.
Shutting Down Properly
Knowing how to stop is as important as knowing how to start.
Normal Shutdown Procedure
Press the off button or turn controls to the off position. The stove initiates a controlled shutdown cycle, continuing to run blowers while remaining pellets burn out. This cycle typically takes twenty to forty-five minutes. Don't unplug the stove during this process.
Allowing Complete Cool-Down
Let the stove cool completely before any cleaning or maintenance. Internal components remain hot long after flames extinguish. Patience during cool-down prevents burns and allows ash to settle for easier cleaning.
Conclusion
Mastering how to start a pellet stove step by step transforms what initially seems complicated into a straightforward routine you'll perform without thinking. Understanding your stove's components, maintaining clean burn pots, loading quality pellets, and following proper startup sequences ensures reliable, efficient heating all winter long. These automated heaters reward basic maintenance with consistent warmth and impressive fuel efficiency. Once you've successfully started your pellet stove a few times, the process becomes second nature.
Read next: Does a Gas Stove Need Electricity to Work?
Frequently Asked Questions
1.How long does it take for a pellet stove to heat up?
Most pellet stoves produce noticeable heat within fifteen to thirty minutes after successful ignition starts.
2.Can I leave my pellet stove running overnight?
Yes, pellet stoves are designed for extended unattended operation with proper fuel supply and maintenance.
3.What happens if my pellet stove runs out of pellets?
The stove will shut down automatically once the burn pot empties and flame sensors detect no fire.
4.How often should I clean my pellet stove's burn pot?
Clean the burn pot daily or before each use for optimal ignition and combustion performance.
5.Why does my pellet stove make clicking sounds during operation?
Clicking typically indicates the auger motor cycling on to feed pellets, which is completely normal operation.
Stay up to date with our latest ideas!